Free Portable Sheep or Goat
Loading Ramp Plans 2.2 Metre


Free Portable Goat and Sheep Loading Ramp Plans 2.2 Metre

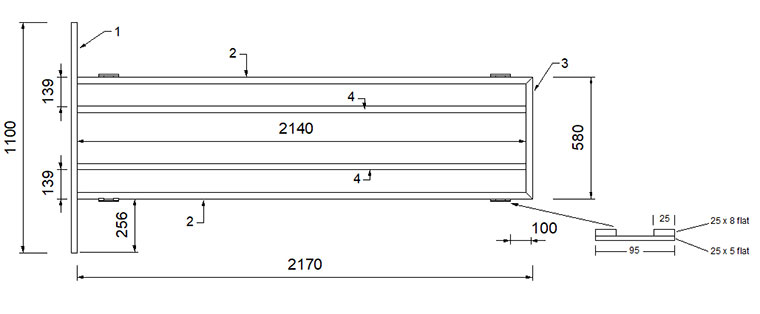
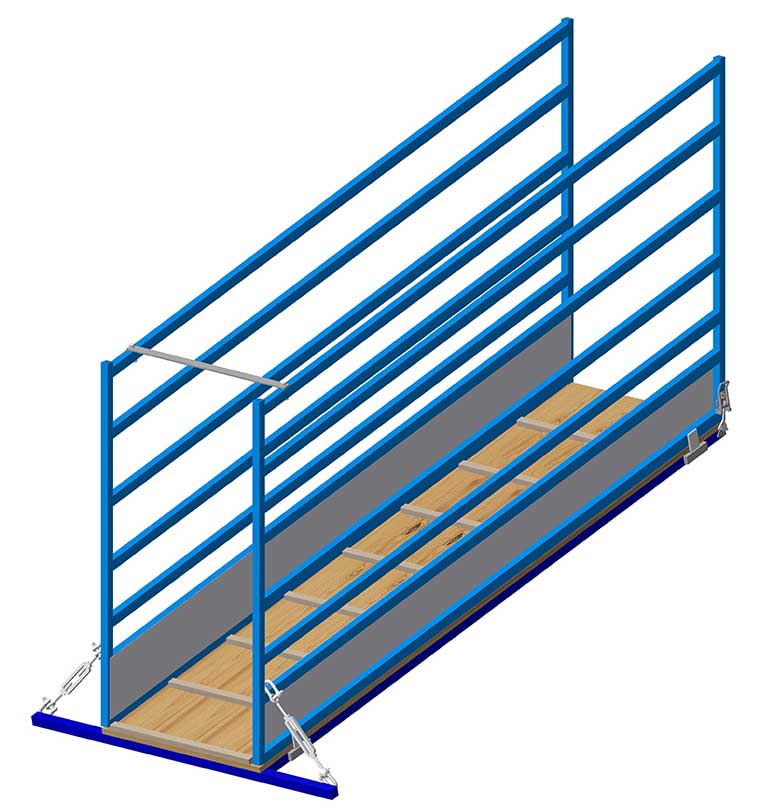
This 2.2 metre portable loading ramp is suitable for loading or unloading either sheep or goats. It can be transported easily as it breaks down into 3 separate parts.

The steel shown in the cutting list is only a guide as you may have other material already available that you can use.

Note: If using timber for the floor, it is best to check the width of the timber you are going to use before cutting the angle for the floor to length to eliminate the need to rip the boards to fit.

Materials Required
Item Number Material Length Quantity
1 30x30mm SHS 1100mm 1
2 30x30mm SHS 2170mm 2
3 30x30mm SHS 580mm 1
4 25x25mm SHS 2140mm 2
5 25x25mm SHS 1100mm 4
6 25x25mm SHS 2145mm 14
7 40x5mm flat bar 75mm 4
8 25x8mm flat bar 25mm 8
9 25x5mm flat bar 95mm 4
10 25x5mm flat bar 580mm 1
Sheet for sides of ramp Approx. 1-1.1mm thick  
Flooring material Steel or aluminium sheet or timber  
D Shackles   4
Turnbuckles   2
Over centre latches   2
M8 zinc plated nuts   2
M8x40 zinc plated bolt   2
25x25 plastic caps   4
portable sheep or goat loading ramp base plans

Diagram 1

1. Begin by cutting all of the steel as indicated in the cutting list. Label each with the item number on it using a marking pen and set aside.

2. Tack weld items 1, 2 and 3 together as shown in diagram 1. Ensure that base frame is square and fully weld.

portable sheep or goat loading ramp sides plans

Diagram 2

3. Tack weld together 2 of items 5 and 7 of items 6 as shown in diagram 2. Check that everything is aligned as it should be and fully weld.

4. The second side can now be welded as done in the previous step. This first side can be used as a jig for the second side

portable sheep goat ramp side tabs plans

Diagram 3

5. Weld items 7 as shown in diagram 3. These have to be positioned on the outside edge of each side.

portable sheep goat ramp side sheets plans

Diagram 4

6. Cut the sheet for the sides of the ramp and secure in place to the inside face of the sides by either welding or riveting. Refer to diagram 4. These are fitted to the two lower rails of the sides.

portable sheep goat ramp sides flat bar plans

Diagram 5

7. Weld items 8 and 9 together as shown in diagram 5. Four of these assemblies are required.


portable sheep goat ramp sides flat bar installed plans

Diagram 6

8. Position one of the sides on top of the base and weld the assembled items 8 and 9 onto the base frame as shown in diagram 6. Repeat for the remaining 3.

9. Next step is to install your choice of floor to the base. This can either be steel or aluminium sheet or timber. Install either timber or steel SHS cleats to the floor approximately 250mm apart.

10. Grind any welds as required and paint.

portable sheep goat ramp support flat bar plans

Diagram 6

10. Drill an 8.5mm hole into each end of item 10. The centre of each hole should be approximately 12mm in from each end.

11. Position item 10 on the top of the rail and drill an 8.5mm hole through each. Refer to diagram 6. Secure the flat bar using M8x40mm bolt and nut. If you wish, one bolt can be installed with a nyloc nut (nylon-insert lock nut) and the remaining bolt can be tack welded so that the head of the bolt is on the under side of the top rail and secure with a wing nut for easy assembly. Refer to diagram 6.

portable sheep goat ramp d shackle and turn buckle plans

Diagram 6

12. Install the D shackles and turnbuckles to each end of the ramp as shown in diagram 7.

portable sheep goat ramp over centre latch plans

Diagram 6

13. Install the over centre latches to the opposite end of the ramp. Refer to diagram 8.

14. Clean any welds using a grinding wheel or flap disc and paint as required

Insert the 25x25 plastic caps into the tops of items 5 (side post uprights).

User Comments

It looks like a lot of effort has gone into making these plans. Very clearly explained.

Leave a comment


© 2010 Kurraglen Industries All rights reserved